Trying to use a faulty dstv remote can be very annoying. If your dstv remote is not working, that doesn’t make it completely useless. You can make it work again in a few, simple – do it yourself – steps. Let me show you how.
Check For Infrared Signal
Check to see if the remote is still sending out a signal. You can do this by using a smartphone. Remotes such as the multichoice remote send out infrared.
If the remote is working, the signal will be produced, but you can’t see this with your naked eye. So we need to check for this infrared signal with a smartphone
Turn on your smartphone camera, point your remote at the camera and try to press some buttons. If the remote is working, you will see a white light in the tiny bulb on the remote.
The video below shows you how to check for a signal from your dstv remote control using a smartphone.
A DStv remote control uses infrared to relay a signal to the dstv decoder. Unlike Bluetooth, signals transferred using infrared have – a straight – Line of Sight.
This means that if there is any object blocking the imaginary straight line from your dstv remote to your decoder, you won’t get any response from the decoder even when the remote is working.
So firstly, make sure there is no object blocking the imaginary straight line from your dstv remote to your dstv decoder.
Replace the old batteries just to be sure the problem is not dead batteries.
Check the metals in the dstv remote that connect the batteries. If the metal is covered with rust, there won’t be any flow of current from the battery to the remote. If there is rust, scrape it off and put back the batteries.
If you do all these but the remote won’t work, proceed to the next step.
Opening your dstv remote
Dstv remote not working after trying to fix it using the steps above? Don’t panic! There is still a way of fixing it yourself.
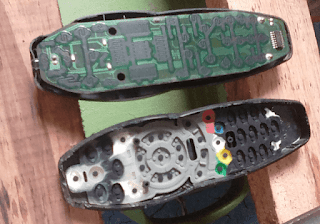
Unlike other electronic devices, remotes don’t have complex structures. All you have in a remote is a rubber membrane on a flat board just like what you have in the image below.
The rubber membrane comes with the buttons but in rare cases, the buttons may be separated from the membrane.
A typical dstv remote can be opened and recoupled by a 6-year-old. It’s that easy! Here is how it’s done.
How to Open a DStv Remote
Take a picture of your dstv remote. You need the picture in case you forget the way the membrane was placed.
Get a flat metal: you could use a small kitchen knife. Put the knife properly on the lining at the side of the remote and force it open. Be careful! It won’t be my fault if you wound yourself.
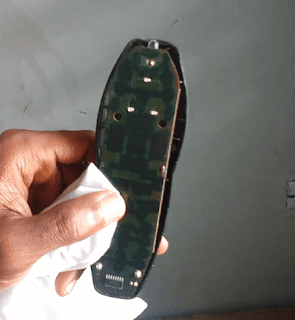
Clean the board as shown in the picture below. Clean it with a kerchief or toothbrush dipped in methylated spirit.
You could also use a kerchief or toothbrush dipped in water if the methylated spirit is not available. Remove all the dirt on the board, the membrane and the remote buttons. Dry the parts.
Check the small metal springs and the soldered parts to make sure nothing is broken. If there is a fault, put back – join – the metals using a soldering iron.
Once you are done, couple the remote, put in the batteries and test it.
Related: DStv Compact Channels List
This does not only work on dstv remotes. You can use this method to repair any remote.
The next time you hear someone say my dstv remote is not working, show them how to fix it.
Replacing Your Dstv Remote
You may need to get a new remote or a dstv remote app
 if you still have your dstv remote not responding to decoder after doing everything mentioned above. But before you do that, drop your comments below – let us know how you are doing.
Locating the Standby button on a remote
The standby button is usually located at the upper end of the remote. It is also known as the power button and it carries the symbol: .
Related: DStv Access Channels List


My remote is showing the backlight on all buttons and it’s not working. I need help turning off backlight.
Hi, Melody. Change the batteries first. If the problem continues, follow the instructions in the article above to fix it.